Introduction
As you know, a database is used to store information in an organized way so that we can easily store and access that information. If you want to interact with SQL databases, you have to use the JDBC (Java Database Connectivity) API.
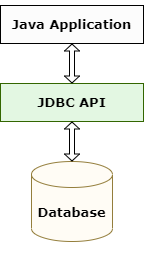
This API allows you to –
- Establish connection to database.
- Insert data in database.
- Get data from the database.
- Update data in database.
- Delete data from database.
- Commit or rollback transaction.
Java supports all databases that provide jdbc drivers and all major databases do that. For our examples we will use the Oracle database.
JDBC driver
A java application can access a variety of databases like Oracle, MySQL etc. You may think, to interact with different databases, you need to write different applications. But that is not the case. Same code can work with different databases, you just have to use a database specific component. That component is called JDBC Driver. To connect with individual databases, JDBC requires drivers for each database. The driver takes care of transferring the query and result between Java application and database.
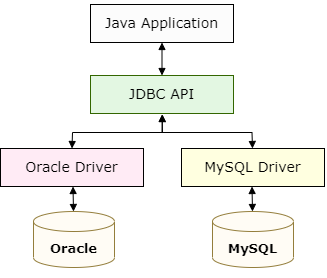
JDBC Driver Manager
The JDBC Driver Manager manages the set of JDBC drivers that are being used in the application. The Driver Manager keeps track of the drivers that are available and acts as an interface between application and JDBC drivers.
If we want to create a connection with a database, we pass a connection URL to the Driver Manager. Based on the URL, the Driver Manager finds the suitable driver and establishes a connection between the database and the application through that driver.
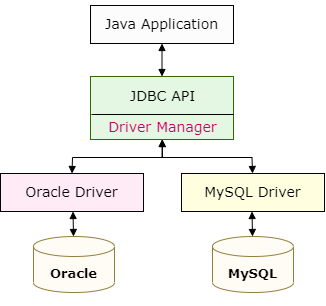
Before establishing a connection, the DriverManager must be made aware of the available JDBC drivers. To do that, we have to load the driver class into the JVM by calling the method Class.forName().
Class.forName("oracle.jdbc.driver.OracleDriver");
The driver class registers itself to the Driver Manager using the DriverManager.registerDriver() method. This call is written in a static block of the drive class so that it can be executed automatically by JVM during class loading.
public class OracleDriver implements Driver {
    static {
        OracleDriver defaultDriver = new OracleDriver();
        DriverManager.registerDriver(defaultDriver);
    }
}
Connection
To interact with a database, we need to use a java.sql.Connection object. To get this object, we can use the getConnection() method of the DriverManager class. This method receives a specific URL that contains database host and port, database username and database password as parameters and returns the connection object.
Class.forName("oracle.jdbc.driver.OracleDriver");
String url = "jdbc:oracle:thin:@localhost:1521:xe";
Connection con = DriverManager.getConnection(url ,"user1","Password1");
Don’t forget to close the connection once you are done. You can close the connection using Connection.close() method.
Connection auto commit mode
When a connection is created, it sets the auto commit mode to true. This means, each individual SQL statement is automatically committed right after it is executed. In other words, individual statements are treated as individual transactions.
We can also set the auto commit mode to false using the method Connection.setAutoCommit(). In this case, changes will not be persisted automatically to the database. You have to commit the transaction by yourself using the Connection.commit() method. You can also rollback the transaction using Connection.rollback() method.
It may seem like it’s better to set auto commit mode to true. But that is not always true. Let’s consider a scenario where you have to execute a PreparedStatement 100 times with 100 different values. You want to persist the data only if all the executions are successful.
This is not possible in auto commit mode as individual SQL statements will be automatically committed right after it is executed. If we set the auto commit as false, we will be able to commit the transaction at the very end and in case of any failure, we can just roll-back the transaction.
Another problem is, as auto commit forces the JDBC driver to run every SQL statement in its own transaction, it will be slower than grouping the entire operation as a single transaction.
JDBC Statement
To execute SQL queries in a database, you need a Statement object. This object offers methods to execute different types of SQL statements. You can get a Statement object from the connection object.
To retrieve data from the database, you can use executeQuery() method and to update, insert and delete data, you can use executeUpdate() method.
To execute a query, mostly we use either Statement or PreparedStatement.
Statement: Statement interface accepts SQL queries and executes that. But, if you want placeholders in your query that should be replaced by dynamic value at runtime, you can not do that. Also, performance wise it is a little slow. This is preferred if you want to run SQL query only once.
String query = "select * from student where name = 'Aditi'";
Statement stmt = conn.createStatement();
ResultSet rs = stmt.executeQuery(query);
PreparedStatement: PreparedStatement interface can accept queries with placeholders that should be replaced by dynamic value at runtime. Performance wise it is better than Statement. So, if you want to execute SQL queries multiple times, stick to this.
String query = "select * from student where name = ?";
PreparedStatement stmt = conn.prepareStatement(query);
stmt.setString(1, "Aditi");
ResultSet rs = stmt.executeQuery();
RessultSet
The basic purpose of ResultSet is to store the results of a select query. We can iterate through the ResultSet rows using ResultSet.next() method. The next method moves the cursor to the next row.
while(rs.next()) {
    // access column values
}
The ResultSet class contains many methods to access the value of a column of the current row. We can access the value by the column name or position. The column names are case insensitive. Also note, column position starts from 1, not from 0.

Just like getString(), there are many other methods like: getString(), getDate(), getInt(),
getFloat() etc.
A sample program
We already know that the DriverManager creates the Connection, that Connection creates Statement to execute SQL query in database.
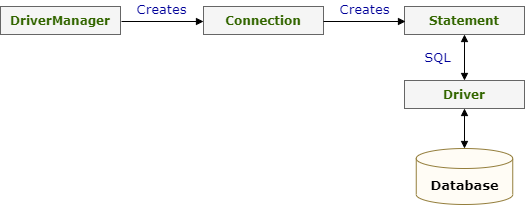
Let’s try to create a sample program and perform following –
- Insert data to the Student table.
- Then update one row.
- Delete one row.
- Iterate over all the rows and print values.
We’ll be using the Oracle database and JDK 1.8. Also, downloaded a Oracle driver (ojdbc8.jar).
First of all create a table using following query –
CREATE TABLE STUDENT (
        NAME VARCHAR2(100 CHAR) PRIMARY KEY,
        ROLL_NO NUMBER(16, 0)
);
Then in Eclipse IDE, create a class JDBCDemo.java. Now, add the driver jar file to your build path. To do that, right click on this class and navigate to: Build Path > Configure Build Path > Select Libraries tab > Add External JARs > Select the JAR file > Apply and Close.
Please find following DB details that I am going to use –
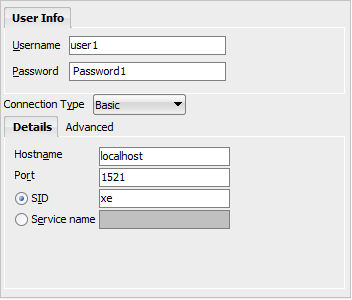
Our setup is ready now. We can jump into the coding part.
public class JDBCDemo {
    public static void main(String args[]) throws SQLException {
        Connection con = null;

        try {
            Class.forName("oracle.jdbc.driver.OracleDriver");
            String url = "jdbc:oracle:thin:@localhost:1521:xe";
            con = DriverManager.getConnection(url ,"user1","Password1");
            con.setAutoCommit(false);

            String query = "insert into student (name, roll_no) values (?, ?)";
            PreparedStatement pstmt = con.prepareStatement(query);

            for (int i=1; i<=5; i++) {
                pstmt.setString(1, "Name-" + i);
                pstmt.setInt(2, i);
                pstmt.executeUpdate();
            }


            Statement stmt = con.createStatement();
            stmt.executeUpdate("update student set roll_no = 22 where roll_no = 2");
            stmt.executeUpdate("delete from student where roll_no = 4");

            ResultSet rs = stmt.executeQuery("select * from student");
            while(rs.next()) {
                System.out.println(rs.getString(1) + " : " + rs.getInt("roll_no"));
            }
            con.commit();
        } catch (Exception e) {
            e.printStackTrace();
            con.rollback();
        } finally {
            con.close();
        }

    }
}
Output:
Name-1 : 1
Name-2 : 22
Name-3 : 3
Name-5 : 5
That’s it for now. Hope you have enjoyed this tutorial. If you have any doubt, please ask in the comment section. I will try to answer that as soon as possible. Till then, bye bye.
