To develop web applications, we can use the Spring MVC module that provides Model View Controller (MVC) framework for web application development. It also provides support for other features like i18n, validation, theming etc. to help the implementation of the presentation layer.
In the case of web application, instead of ApplicationContext we will work with WebApplicationContext. WebApplicationContext extends ApplicationContext and it is designed to work with javax.servlet.ServletContext.
public interface WebApplicationContext extends ApplicationContext {
    ServletContext getServletContext();
}
Workflow of Spring MVC
In Spring MVC, DispatcherServlet is the front controller that receives the incoming requests and dispatches them to the appropriate registered controllers created by us. We annotate our controller classes with @Controller annotation. Inside our controller class, we create methods to handle the request and return the view page for the user.
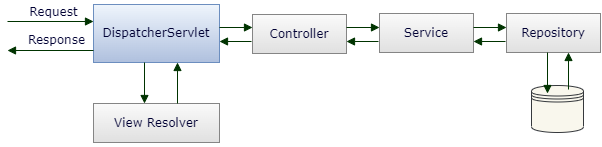
As we can see from the above diagram, when a request is received by the Spring MVC Framework, the following sequence of events happen –
- The DispatcherServlet first receives the request.
- The DispatcherServlet then invokes the Controller associated with the request.
- The Controller calls the required service and returns a ModeAndView object to the DispatcherServlet. The ModeAndView object contains the model data and the view name.
- The DispatcherServlet sends the view name to the ViewResolver to get the actual View.
- The View will render the result based on the model data and send the result back to the user.
Declare maven dependency
Before going into the implementation, let’s add the minimal dependency that we need.
<dependency>
    <groupId>org.springframework</groupId>
    <artifactId>spring-webmvc</artifactId>
    <version>5.3.21</version>
</dependency>
<dependency>
    <groupId>javax.servlet</groupId>
    <artifactId>javax.servlet-api</artifactId>
    <version>3.1.0</version>
</dependency>
<dependency>
    <groupId>javax.servlet</groupId>
    <artifactId>jstl</artifactId>
    <version>1.2</version>
</dependency>
Register DispatcherServlet
Starting from Servlet 3.0, instead of configuring DispatcherServlet in the web.xml file, we can also configure the DispatcherServlet programmatically by implementing/extending either of these three classes provided by Spring –
- WebAppInitializer interface
- AbstractDispatcherServletInitializer abstract class
- AbstractAnnotationConfigDispatcherServletInitializer abstract class
In our example, we will extend AbstractAnnotationConfigDispatcherServletInitializer because this is easier to use.
In a Spring MVC application, there can be multiple numbers of DispatcherServlet for various purposes. For example, one DispatcherServlet can be used to handle UI requests and another to handle RESTful-WS requests. In case of multiple DispatcherServlet, each will have its own WebApplicationContext. However, Spring will maintain one root WebApplicationContext. Individual DispatcherServlets will inherit all the beans already defined in the root WebApplicationContext. Even if we have multiple DispatcherServlets in our application, they might share some common beans like datasources, transactionManager etc. So, if we configure those beans in the root WebApplicationContext, those beans will be available for all the WebApplicationContext.
In our example, we will configure a single DispatcherServlet.
public class WebInitializer extends AbstractAnnotationConfigDispatcherServletInitializer {
    @Override
    protected Class<?>[] getRootConfigClasses() {
        return null;
    }

    @Override
    protected Class<?>[] getServletConfigClasses() {
        return new Class<?>[] {WebConfig.class};
    }

    @Override
    protected String[] getServletMappings() {
        return new String[] {"/"};
    }
}
In our example, we will not interact with the database. Rather we will return hardcoded values for simplicity. But if you have a configuration class named DBConfig to configure dataSource, entityManagerFactory, transactionManager etc. you can mention that inside getRootConfigClasses() metod.
protected Class<?>[] getRootConfigClasses() {
    return new Class<?>[] {DBConfig.class};
}
We will create WebConfig in a while. But remember, as we have a single DispatcherServlet here, even if we add WebConfig in root config, that is also fine.
Spring WebMVC Configuration
To enable Spring MVC support, we have to add the @EnableWebMvc annotation on our configuration class. Although there can be multiple configuration classes in a Spring application, only one class can be annotated with @EnableWebMvc annotation.
@EnableWebMvc
@Configuration
public class WebConfig {
    ....
}
If we want to customize the default configuration enabled by @EnableWebMvc annotation, we need to implement the WebMvcConfigurer interface. This interface defines callback methods that we can override to customize the Spring MVC configuration.
@ComponentScan(basePackages = {"com.kcs"})
@EnableWebMvc
@Configuration
public class WebConfig implements WebMvcConfigurer {
    @Bean
    public InternalResourceViewResolver resolver() {
        InternalResourceViewResolver resolver = new InternalResourceViewResolver();
        resolver.setPrefix("/WEB-INF/views/");
        resolver.setSuffix(".jsp");
        return resolver;
    }
}
The ViewResolver Strategy provided by Spring provides loose coupling between the view and controller. In our example we have used InternalResourceViewResolver and provided configuration for suffix and prefix. Based on our configuration, once a view name is returned by the controller, our view resolver will prepend /WEB-INF/views/ and append .jsp with the view name to get the actual view. So, if the view name returned by the controller is hello, the resultant view would be /WEB-INF/views/hello.jsp.
Create a model class
public class User {
    private long userId;
    private String userName;

    public User(long userId, String userName) {
        this.userId = userId;
        this.userName = userName;
    }

    // getters and setters
}
Create controller
The annotation @Controller is used to mark a class as Spring MVC controller.
@Controller
public class UserController {
    @RequestMapping(path = "userList", method = RequestMethod.GET)
    public String getUserList(Model model) {
        User user1 = new User(1L, "Tom");
        User user2 = new User(2L, "Jerry");
        List<User> allUsers = Arrays.asList(user1, user2);
        model.addAttribute("users", allUsers);
        return "userList";
    }
}
The @RequestMapping annotation indicates the URL that will be handled by the controller. In our example any GET request to the URL with the prefix /userList will be handled by the getUserList() method. Also, the logical view name returned by this method is userList. As per our InternalResourceViewResolver configuration, Spring MVC will select the view /WEB-INF/views/userList.jsp.
Create view
Now create a view named userList.jsp under /WEB-INF/views folder.
<%@ page language="java" contentType="text/html; charset=ISO-8859-1"
    pageEncoding="ISO-8859-1"%>
<%@ taglib uri="http://java.sun.com/jsp/jstl/core" prefix="c"%>
<%@ page isELIgnored="false" %>
<!DOCTYPE html>
<html>
<body>
    <h1>User List</h1>
    <table border = "1" width = "20%">
        <c:forEach items="${users}" var="user">
            <tr>
                <td>${user.userId}</td>
                <td>${user.userName}</td>
            </tr>
        </c:forEach>
    </table>
</body>
</html>
Test the app
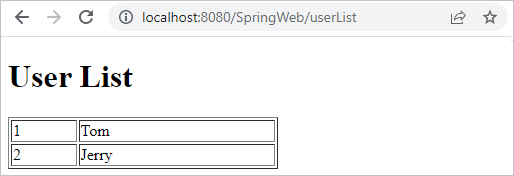
Once the application is up and running in the tomcat server, hit the following URL in the browser: http://localhost:8080/SpringWeb/userList. Please note, the context name (SpringWeb) might be different for you.
You will output like below –
That’s it for now. Hope you have enjoyed this tutorial. If you have any doubt, please ask in the comment section. I will try to answer that as soon as possible. Till then, bye bye.