Introduction
A thread in Java simply means a single independent path to execute a group of statements one after another. Every thread in Java is represented by an object of class Thread.
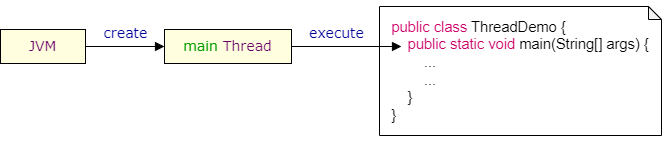
When we write a code, we basically write a group of statements. These statements are executed one by one by JVM. This execution happens in a thread.
To understand this, first write a simple program.
public class ThreadDemo {
public static void main(String[] args) {
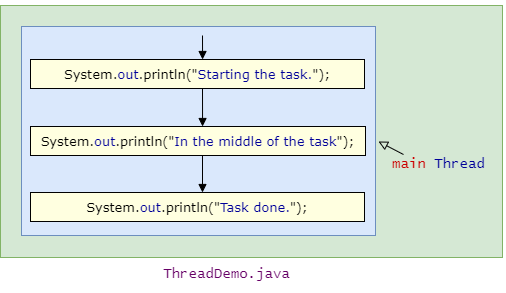
System.out.println("Starting the task.");
System.out.println("In the middle of the task");
System.out.println("Task done.");
}
}
When we run this program, it begins by executing the very first statement in the main() method and executes all the remaining statements sequentially until it finds the very last statement. So you will see following output –
Starting the task.
In the middle of the task
Task done.
As we said earlier, all the statements are executed by JVM in a thread. But we didn’t create any objects from the Thread class. Then how come any thread even exists?
The main thread
We all know that the main() method is the entry point in a Java program from where the execution starts. Whenever we run a Java program, the JVM automatically creates a new thread called the main thread. The main thread first identifies the main() method and starts the execution from there.
As you can see, every Java program always has at least one thread, the main thread, even if we do not create any thread. When this main thread finishes the execution, the program terminates immediately.
From the main thread, we can create other threads. So, the main thread is called parent thread and the rest of threads that are generated from main thread are called child threads.
When we do not create any child thread, only the main thread exists. We call this type of program a single-threaded program. But, when we create child threads, we call that a multi-threaded program. In the case of a multi-threaded program, each thread executes parallelly on its own path.
Why do we need multithreading?
Nowadays the CPU comes with multiple cores and it can execute multiple instructions at the same time. So, if your program is single-threaded, all the instructions that you have written in your program run sequentially and you can utilize at most one core at a time. So, if you have 4 core processor, you basically give up 75% of the available processing power.
In many situations, it is possible to divide our program into multiple tasks which can run asynchronously in separate threads. For example, while typing on a word document – one thread can display the content, other threads can check the spelling and grammar. Those threads can run concurrently on multiple cores to utilize the available processing power more effectively. As individual tasks are executed parallely, the response time will be faster than executing them sequentially.
Even in the case of a single core processor, multithreading can utilize the processor more effectively. For example, if a thread is waiting for a resource, rather than sitting idle, the processor can be utilized to handle another thread.
Another important aspect is responsiveness. Suppose you have a single threaded GUI (Graphical user interface) application which is capable of doing 3 different tasks. There is also one Cancel button to stop any task.
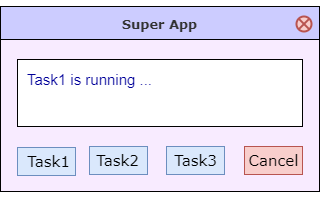
Suppose you have clicked on Task1 which is taking time. Until the Task1 is finished, the UI will appear to freeze and it will become unresponsive. And the worst part is, you won’t be able to even cancel the task as the UI is unresponsive. Once the Task1 is finished, the UI will start responding again.
So, a better solution would be – execute individual tasks in separate threads to keep the UI responsive.
How to create thread
We can define a thread in either of the two ways –
1. By extending java.lang.Thread class.
public class ThreadDemo extends Thread {
    @Override
    public void run() {
        // Some code
    }
}
If we extend the Thread class, then the instantiation is simple. Just create an instance of that class.
ThreadDemo t = new ThreadDemo();
2. By implementing the java.lang.Runnable interface.
public class MyRunnable implements Runnable {
    @Override
    public void run() {
        // Some code
    }
}
If we implement a Runnable interface then, it’s a two step process. First create the instance of the Runnable class and then call the thread class constructor which takes a Runnable class as argument.
MyRunnable r = new MyRunnable();
Thread t = new Thread(r); //pass the Runnable to the Thread
If you want, you can also pass a name of the thread –
MyRunnable r = new MyRunnable();
Thread t = new Thread(r, “Thread Name”);
As you have seen, in both the approaches, we override the run() method. Because this method is the entry point of a thread. To start a thread, we call the start() method and internally JVM will call the run() method.
Now the question is, which approach is better. I would say, implementing Runnable is better than extending Thread because –
- It allows you to keep your work only loosely coupled with your choice of concurrency. For example, currently you may be using MyRunnable class to create a thread and calling
start()method to start that thread. But later on if you decide not to use multithreading, you can use this MyRunnable class as it is and call therun()method. - When you extend a Thread class, after that you can’t extend any other class which might be required.
- In Object oriented programming, we normally extend a class to add new methods or modify existing parent class methods. So, if we are not making any modification on Thread class methods (which normally we don’t do), then it’s better to use Runnable interface.
Why are we calling the start() method instead of run() method?
As you have seen, we define the task of a thread inside run() method. But instead of calling this method directly, we call the start() method. The reason behind this is – when we call the start() method, it creates a new thread wherein the run() method gets called. But if you call the run() method directly, it doesn’t create a new Thread. Instead it executes the run() method in the current Thread from which the run() method is invoked. To test this, let’s execute the following code.
public class MyRunnable implements Runnable {
    @Override
    public void run() {
        System.out.println("Current thread is: " + Thread.currentThread().getName());
    }
}
public class ThreadDemo extends Thread {
    public static void main(String[] args) {
        Thread thread = new Thread(new MyRunnable(), "Test Thread");
        thread.run();
        thread.start();
    }
}
Output:
Current thread is: main
Current thread is: Test Thread
As you can see, when we call the run() method directly, it’s running on the main thread. But if we call the start() method, it’s running on a separate thread.
Pausing Execution
We can use the Thread.sleep() method to suspend the execution of the current thread for a specified period. Two overloaded versions of sleep() method is available –
- sleep(long millis)
- sleep(long millis, int nanos
The first method ceases the execution for the specified milliseconds. The second method ceases the execution for the specified milliseconds plus the specified nanoseconds.
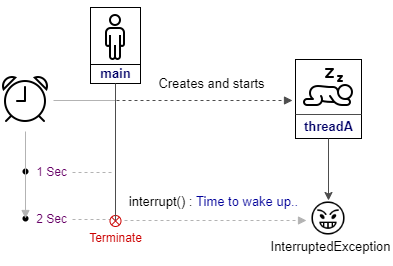
Please note, the sleep period can be terminated by calling the interrupt() method on the thread. If you do that, the sleeping thread will throw an InterruptedException and break out of the sleeping state.
To test this, let’s create a class that implements Runnable interface –
public class MyRunnable implements Runnable {
    @Override
    public void run() {
        try {
            Thread.sleep(5000);
            System.out.println(Thread.currentThread().getName() + " is not interrupted");
        } catch (InterruptedException e) {
            System.out.println(Thread.currentThread().getName() + " is interrupted");
        }
    }
}
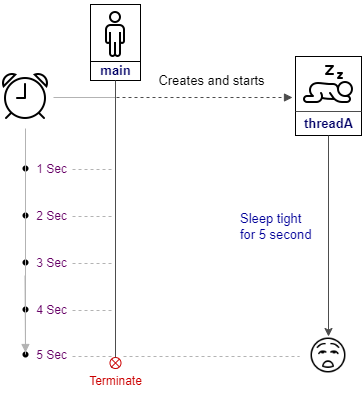
Sleep without interruption:
Thread threadA = new Thread(new MyRunnable(), "Test Thread");
threadA.start();
After 5 second, you will see an output: Test Thread is not interrupted.
Sleep with interruption:
Thread threadA = new Thread(new MyRunnable(), "Test Thread");
threadA.start();
Thread.sleep(2000);
threadA.interrupt();
After approximately 2 second, you will see the output: Test Thread is interrupted.
Risks of threads
Java might simplify the development of concurrent applications by providing language and library support but incorrect use of it may lead to some serious problems. Two most common problems are – race conditions and deadlock. We will discuss the deadlock a little later.
Race Condition
To understand this, let’s first create a Sequencer class that will increase a counter variable by 1 and print that value.
public class Sequencer implements Runnable {
    private int counter;

    public int getNext() {
        return ++counter;
    }

    @Override
    public void run() {
        System.out.println(Thread.currentThread().getName() + " : Next value : " + getNext());
    }
}
Now create two threads using this runnable class and start those threads –
public class ThreadDemo {
    public static void main(String[] args) {
        Sequencer sequencer = new Sequencer();
        Thread t1 = new Thread(sequencer, "Thread-1");
        Thread t2 = new Thread(sequencer, "Thread-2");
        t1.start();
        t2.start();
    }
}
Most of the time, you will see following output –
Thread-1 : Next value : 1
Thread-2 : Next value : 2
The reason is pretty simple. When we create an instance of class Sequencer, the counter variable is initialized with the default value 0. Then when we started both the threads –
- Thread-1 increased the value to 1 and displayed that.
- Then Thread-2 saw the current value as 1 and again increased the value by 1 and displayed 2.
But sometimes you will see the output –
Thread-1 : Next value : 1
Thread-2 : Next value : 1
Surprised? In a multithreaded environment with some unlucky timing, the getNext() method could return the same value. Because ++counter may look like a single operation, but it’s a combination of three operations –
- Read the current value of the counter variable.
- Add 1 to the current value.
- Write the new value to counter the variable.
So, it is possible that before one thread is done with step 3, another thread starts step 1 and eventually both will print the same value.

This concurrency hazard is called a race condition. Most common type of race condition is check-then-act. You observe something and take action based on that observation. But by the time you act, the observation becomes invalid.
Now the real question is, can this be fixed? The answer is of course it can be fixed and to do that we have to make the method getNext() synchronized.
Synchronization
In a multithreaded environment, if we try to access and update shared mutable state (e.g. the counter variable) without proper coordination, this problem can happen. Shared variable means it can be accessed by multiple threads and mutable means its value can be changed. When a code does not work properly in a multithreaded environment, we say that code is not thread safe.
To manage the coordination among threads, we use synchronization whenever accessing or updating the shared mutable variable. The primary mechanism for synchronization in Java is the synchronized keyword. The synchronization provides a built-in locking mechanism.
The syntax for synchronized block is given below –
synchronized (lock) {
    // get or update shared state
}
Just like the synchronized block, we can write a synchronized method. In the case of synchronized method, we don’t pass a lock, the object on which the method is being invoked is used as lock.
public synchronized int aMethod() {
    // get or update shared state
}
This will behave similar to following code –
public int aMethod() {
    synchronized (this) {
        // get or update shared state
    }
}
Now the question is, what can be used as a lock? In java, every object can be used as a lock because every object internally contains a lock. This built-in lock is called intrinsic lock or monitor lock. Please remember, at most one thread can own this intrinsic lock.
The lock is automatically acquired by a thread before entering a synchronized block or method and automatically released when it comes out of that block or method either normally or by throwing an exception.
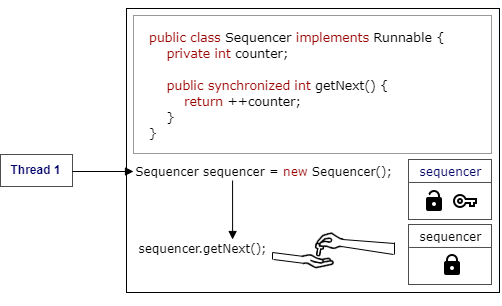
As you can see, when Thread 1 calls the synchronized method getNext() on the object sequencer, it acquires the lock. Then, if another thread Thread 2 attempts to call the same method, as the lock is already acquired Thread 1, Thread 2 must wait until Thread 1 releases the lock by completing the method or throwing an exception.
So, if you rewrite your earlier code and make the getNext() method synchronized, you will always get the correct result.
Volatile variable
To understand volatile variable, let’s consider following class –
public class ThreadDemo {
    public static int sharedInt = 1;
}
Suppose that two threads are working on an instance of this class. If two threads run on different processors each thread may have its own local copy of the shared variable sharedInt. If one thread updates its value from a non synchronized method, there is a possibility that the updated value might not reflect in the main memory immediately. Now the other thread is not aware of that change, it may lead to some problem.
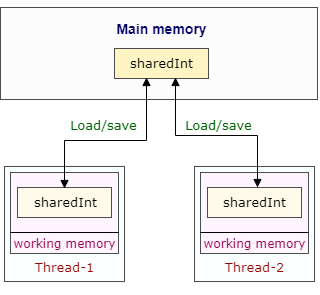
However, if you update the value from a synchronized method, an update by one thread will be updated to the main memory before other threads can access that variable.
In some situations, you may want to ensure the visibility of a variable without a synchronized method. To achieve that, you can mark the variable as volatile.
public class ThreadDemo {
    public static volatile int sharedInt = 1;
}
The reads and writes of a volatile variable will be done directly from the main memory. So, any updates to the variable are visible to other threads. Boolean status fields are good candidates for volatile variables. Please remember, Locking can guarantee both visibility and atomicity, volatile variables can only guarantee visibility.
Thread states
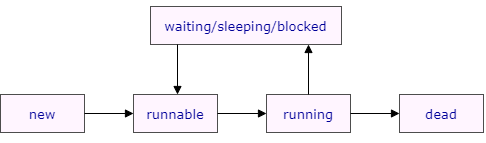
- New: When the Thread instance is created and the
start()method is not invoked, the thread is at New state. - Runnable: When the
start()method is invoked, it becomes ready and eligible to run. When a thread is ready but the thread scheduler has not assigned it for execution, it’s in the runnable state. - Running: When the thread scheduler selects it for the execution, the thread starts its execution and the thread is said to be in Running state.
- Waiting/blocked/sleeping: In this state, the thread is alive but not running. It is waiting for some particular event to occur. After that event it will again move to a runnable state.
- Dead: When a thread completes its
run()method, it is considered dead. Once a thread is dead, it can never be started again. If you callstart()on dead thread, a runtime exception will be thrown.
ThreadLocal
ThreadLocal allows you to attach value to a particular thread. This value can be accessed, updated or removed from that thread. Also, this value is accessible only from that particular thread, not from any other thread.
To test this, first create a ThreadLocal to hold user name for all threads –
public class Globaldata {
    public static final ThreadLocal<String> currentUser = new ThreadLocal<String>();
}
Now, create a Runnable class that will set and access the value from this ThreadLocal.
public class MyRunnable implements Runnable {
    private final String userName;

    public MyRunnable(String userName) {
        this.userName = userName;
    }

    @Override
    public void run() {
        Globaldata.currentUser.set(userName);
        System.out.println(Thread.currentThread().getName() + " : user : " + Globaldata.currentUser.get());
    }
}
If you start different threads and set user names to ThreadLocal from those threads, those values will not interfere with each other. Individual copy will be maintained for individual threads.
Thread t1 = new Thread(new MyRunnable("User-1"), "Thread-1");
Thread t2 = new Thread(new MyRunnable("User-2"), "Thread-2");
t1.start();
t2.start();

Output:

Thread-1 : user : User-1
Thread-2 : user : User-2
UncaughtExceptionHandler
Let’s assume you want to write some error handling code if a thread terminates abruptly due to some uncaught exception. For that, you can use the UncaughtExceptionHandler interface. When a thread is about to terminate due to an uncaught exception the JVM will invoke the provided UncaughtExceptionHandler. Let’s see that in action with the following example. We’ll intentionally throw an exception from the run() method so that the exception handler is invoked.
public class MyRunnable implements Runnable {
    public void run() {
        throw new RuntimeException("Test Exception");
    }
}
public class ThreadExceptionHandler implements Thread.UncaughtExceptionHandler {
     @Override
     public void uncaughtException(Thread t, Throwable e) {
          System.out.println("The Exception Caught: " + e);
     }
}
public class ThreadTester {
     public static void main(String[] args) {
          Thread.setDefaultUncaughtExceptionHandler(new ThreadExceptionHandler());
          Thread t1 = new Thread(new MyRunnable());
          t1.start();
     }
}

Output:

The Exception Caught: java.lang.RuntimeException: Test Exception
JVM shutdown hook
If you want to perform some activity (e.g. cleanup, save current state) before the JVM shuts down normally or abruptly, you can use the shutdown hook. Some common activities are – close log files or other open resources, send an alert etc.
First write the logic that must be executed during shutdown. For testing purposes, we’ll just print a message.
public class MyShutdownHook implements Runnable {
    public void run() {
        System.out.println("Shutdown hook completed");
    }
}
Case1: Shutdown JVM normally:
public class ThreadTester {
    public static void main(String[] args) {
        Runtime.getRuntime().addShutdownHook(new Thread(new MyShutdownHook()));
    }
}

Output: Shutdown hook completed
Case2: Shutdown JVM with Exception:
public class ThreadTester {
    public static void main(String[] args) {
        Runtime.getRuntime().addShutdownHook(new Thread(new MyShutdownHook()));
        throw new RuntimeException("Test Exception");
    }
}

Output:

Exception in thread "main" java.lang.RuntimeException: Test Exception
      at ThreadTester.main(ThreadTester.java:4)
Shutdown hook completed
That’s it for now. Hope you have enjoyed this tutorial. If you have any doubt, please ask in the comment section. I will try to answer that as soon as possible. Till then, bye bye.