As we discussed earlier, we use @Entity annotation to mark a class as an entity and use several other annotations to map an entity with table and entity attributes with column.
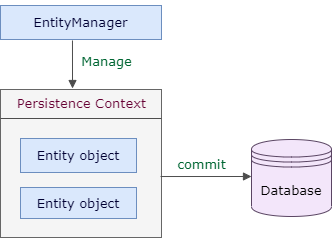
EntityManager is used in an application to persist, search or delete entities from a database. EntityManager also manages the lifecycle of entities defined by a persistence unit.
Persistence unit
A persistence unit is a logical grouping of entities under a database connection. So a persistence unit contains a set of entities and properties related to database connection like user name, password, driver class etc. Every application has at least one persistence unit. If an application is interacting with multiple databases, there may be multiple persistence units with unique names. Each persistence unit is defined in a persistence-unit element in the persistence.xml file. We put this persistence.xml file under the META-INF
<persistence version="2.1"
    xmlns="http://xmlns.jcp.org/xml/ns/persistence"
    xmlns:xsi="http://www.w3.org/2001/XMLSchema-instance"
    xsi:schemaLocation="http://xmlns.jcp.org/xml/ns/persistence
    http://xmlns.jcp.org/xml/ns/persistence_2_1.xsd">
    <persistence-unit name="demoPU1">
        <class>com.demo.Song</class>
        <properties>
            <property name="javax.persistence.jdbc.url" value="jdbc:oracle:thin:@localhost:1521:xe" />
            <property name="javax.persistence.jdbc.user" value="test" />
            <property name="javax.persistence.jdbc.password" value="pass" />
            <property name="javax.persistence.jdbc.driver" value="oracle.jdbc.driver.OracleDriver" />
            <property name="hibernate.dialect" value="org.hibernate.dialect.OracleDialect" />
        </properties>
    </persistence-unit>
</persistence>
If you want to print SQL queries, you can add following properties in persistence.xml –
<property name="hibernate.show_sql" value="true"/>
<property name="hibernate.format_sql" value="true"/>
<property name="hibernate.use_sql_comments" value="true"/>
The class element in persistence.xml is used to list all managed persistence classes. By default, all properly annotated entity classes found inside the same archive (JAR file) whose META-INF directory contains persistence.xml are added to the persistence unit configuration. You are allowed to add external entities using this class element. So, if the persistence classes are present in the same project where you have kept the persistence.xml file, you can ignore to specify persistence classes.
EntityManagerFactory
The main role of EntityManagerFactory is to instantiate EntityManager. To create EntityManagerFactory we use createEntityManagerFactory() static method of Persistence class and pass the persistence unit name as parameter.
EntityManagerFactory factory = Persistence.createEntityManagerFactory("demoPU1");
As EntityManagerFactory instance is a heavyweight object, typically it is created only once during application startup and stays alive till application shuts down.
Once the EntityManagerFactory object is created, we can call createEntityManager() method to get an instance of EntityManager.
EntityManager entityManager = factory.createEntityManager();

EntityTransaction
A transaction is a set of operations that either fail or succeed as a unit. Any operation that can affect the content of the database must be performed within the transaction. In JPA, EntityTransaction Interface provides important methods to handle transactions like begin a transaction, commit or rollback that transaction. Every EntityManager holds a single EntityTransaction instance that we can get using the getTransaction() method.
EntityTransaction transaction = null;

try {
    transaction = entityManager.getTransaction();
    transaction.begin();

    // insert, update or delete operation

    transaction.commit();
} catch (Exception e) {
      transaction.rollback();
}
Persistence Context
Persistence Context is an environment or cache where a set of entity instances are managed by an entity manager instance. Each EntityManager instance is associated with a persistence context. Persistence context keeps track of all the changes made into managed entities. If anything changes during a transaction, then the entity is marked as dirty.
When we commit a transaction, all the dirty entities are synchronized (persisted) to the database. To force synchronization of the managed entity to the database before commit, invoke the flush() method of the EntityManager instance.
The persistence context is closed when you call the close() method of EntityManager. Once the EntityManager is closed, all entity objects are detached from the EntityManager’s persistence context and are no longer managed.
The persistence context acts as a first-level cache. It remembers all the persistent entities it is managing. If you try to load an entity using the find() method, EntityManager will first check the persistence context. If EntityManager finds the entity in the persistence context, no database hit will happen. So, essentially, in persistence context, one and only one reference can exist for a given entity.
Setup workspace
To setup our test environment, we will use –
- Maven as dependency management tool
- Oracle 18c as database
- Eclipse as IDE
- JDK 1.8 as java version.
First of all, install all the required softwares as listed above. Once that is done, create a maven project. I am assuming you are familiar with this.
We already discussed the persistence.xml file. Create this file under src/main/resources/META-INF directory. Please replace the connection properties like user name, password etc. as per your environment.
Specify following dependency in pom.xml file –
<dependency>
    <groupId>org.hibernate</groupId>
    <artifactId>hibernate-entitymanager</artifactId>
    <version>5.6.9.Final</version>
</dependency>
<dependency>
    <groupId>com.oracle.ojdbc</groupId>
    <artifactId>ojdbc8</artifactId>
    <version>19.3.0.0</version>
</dependency>
In the database end, create a schema demotable and sequence
CREATE TABLE DEMO.USER_DETAILS (
    USER_ID NUMBER(16, 0),
    USER_NAME VARCHAR2(100 CHAR),
    EMAIL VARCHAR2(100 CHAR),
    CONSTRAINT PK_USER PRIMARY KEY (USER_ID)
);
CREATE SEQUENCE DEMO.USERID_SEQ INCREMENT BY 1 START WITH 1;
Now create an Usercom.demo –
@Entity
@Table(name = "USER_DETAILS", schema = "demo")
public class User {

    @Id
    @GeneratedValue(strategy = GenerationType.SEQUENCE, generator = "userId_generator")
    @SequenceGenerator(name = "userId_generator", sequenceName = "userId_seq", allocationSize = 1, schema = "demo")
    @Column(name = "USER_ID")
    private long userId;

    @Column(name = "USER_NAME")
    private String userName;

    @Column(name = "EMAIL")
    private String email;

    // getters and setters
}
We will use the following EnityManager methods to test our sample application.
- persist() : Insert an entity into the database.
- find() : Find an entity by primary key.
- remove() : Delete an entity from database.
Now create a class to test entity manager methods –
public class JpaOracleTest {
    public static void main(String[] args) {
        EntityManagerFactory factory = Persistence.createEntityManagerFactory("demoPU1");
        EntityManager entityManager = factory.createEntityManager();
        EntityTransaction transaction = entityManager.getTransaction();
        transaction.begin();

        User user1 = new User();
        user1.setEmail("[email protected]");
        user1.setUserName("User1");

        User user2 = new User();
        user2.setEmail("[email protected]");
        user2.setUserName("User2");

        entityManager.persist(user1);
        entityManager.persist(user2);

        User fetchedUser = entityManager.find(User.class, user1.getUserId());
        entityManager.remove(fetchedUser);

        transaction.commit();
        entityManager.close();
        factory.close();
    }
}
Internally Hibernate will fire 2 insert query followed by 1 delete query. So, at the end, you will see following data in the database –
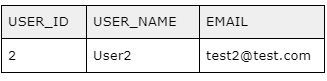
There are many other useful EntityManager methods which we will discuss gradually.
That’s it for now. Hope you have enjoyed this tutorial. If you have any doubt, please ask in the comment section. I will try to answer that as soon as possible. Till then, bye bye.