Before understanding the JPA lifecycle events, let’s understand how to map temporal types.
Mapping temporal types
Most databases support a few different temporal data types with different levels of accuracy. As per JPA specification, you should annotate persistent fields of temporal type (e.g. java.util.Date, java.util.Calendar) with @Temporal annotation. This annotation is used to convert the date and time values from Java objects to compatible database types and retrieve them back to the application.
When you use @Temporal annotation, you have to specify a temporal type. There are 3 TemporalType options available –
- DATE : it represents only the date part (e.g. 2022-06-06)
- TIME : it represents only the time part (e.g. 23:59:59)
- TIMESTAMP : it represents both date and time (e.g. 2022-06-06 23:59:59)
If you don’t specify @Temporal annotation, Hibernate will default to TIMESTAMP. But always specify this annotation to have better control.
@Temporal(TemporalType.DATE)
@Column(name = "AUTHORIZED_DATE")
private Date authorizedDate;
JPA Lifecycle Events
JPA allows us to write methods that should be invoked automatically when entity lifecycle events occur. For this purpose we write callback methods within entity classes and use annotation to specify when that method should be invoked.
You have to keep following points in mind while writing the callback methods –
- Methods should always return
void. - Methods should not take any arguments.
- Methods can have any name and any access modifier.
- Methods should not be
static.
As we said, annotation will specify when the callback methods will be invoked. So, first take a look at those annotations –
| Annotation | Invocation time |
|---|---|
| @PrePersist | Before persisting new entity |
| @PostPersist | After persisting new entity |
| @PreUpdate | Before updating an entity |
| @PostUpdate | After updating an entity |
| @PreRemove | Before deleting an entity |
| @PostRemove | After deleting an entity |
| @PostLoad | After retrieving an entity from database |
To see this in action, let’s assume you have two attributes in User entity – createdTime and UpdatedTime.
@Entity
@Table(name = "USER_DETAILS", schema = "demo")
public class User {

    @Id
    @Column(name = "USER_ID")
    private long userId;

    @Temporal(TemporalType.TIMESTAMP)
    @Column(name = "CREATED_TIME")
    private Date createdTime;

    @Temporal(TemporalType.TIMESTAMP)
    @Column(name = "UPDATED_TIME")
    private Date updatedTime;

    // getter and setter
}
You want to set createdTime and UpdatedTime automatically. To achieve that, before persisting the entity for the very first time, you should set the createdTime and before each update, you should update the updatedTime. In this situation, we can use the @PrePersist and @PreUpdate annotation.
@Entity
@Table(name = "USER_DETAILS", schema = "demo")
public class User {

    // Previous attributes

    @PreUpdate
    protected void setUpdateDefaults() {
        setUpdatedTime(new Date());
    }

    @PrePersist
    protected void setCreateDefaults() {
        setCreatedTime(new Date());
    }
}
If you persist the entity for the very first time without setting the createdTime attribute value, you will see created time is populated automatically.

For subsequent updates, updatedTime will be populated automatically.

As you can see, callback methods are invoked by JPA based on lifecycle events. This is very helpful to populate audit columns like created time, updated time etc. automatically.
Mapping enum
To understand this let’s first create an enum.
public enum Occupation {
    ENGINEER,
    FARMER,
    OTHER
}
In the database create a VARCHAR column with name occupation. Then map this enum to that column.
@Entity
public class User {
    @Column(name = "OCCUPATION")
    private Occupation occupation;
}
If you save the User entity after setting occupation, by default Hibernate will save the ordinal value. Which essentially means –
ENGINEERwill be saved as 0FARMERwill be saved as 1OTHERwill be saved as 2
Let’s save a user object with occupation FARMER. So, in the database this will be saved as 1.
Now, add another occupation to the enum as DOCTOR after ENGINEER.
public enum Occupation {
    ENGINEER,
    DOCTOR,
    FARMER,
    OTHER
}
Now, if you retrieve the same user, you will see the occupation is retrieved as DOCTOR.
I believe you have already guessed the problem. In the database the occupation column value is 1. After updating the enum, DOCTOR has the ordinal value 1. As a result, the occupation is shown as DOCTOR.
To solve this, you should use @Enumerated annotation and specify EnumType value. The default is ORDINAL. You should specify the type as STRING which will store the label of the enum value as is.
So, add the @Enumerated annotation to the occupation field.
@Entity
public class User {
    @Enumerated(EnumType.STRING)
    @Column(name = "OCCUPATION")
    private Occupation occupation;
}
Now, if you set the occupation as Occupation.FARMER, in the database you will see the occupation value is saved as FARMER. This is much safer than using the ordinal value.
Mapping BLOB and CLOB
Databases use two special data types BLOB (binary large object) and CLOB (character large object) to store large objects. Together they are known as LOB (Large Object).
BLOB is used to store large binary data. So you can store files like video, image, audio in the BLOB column as a byte array.
On the other hand, CLOB is used to store large textual data. So you can store very long texts in the CLOB column.
When you are dealing with BLOB or CLOB, corresponding entity attributes should be annotated with @Lob.
Let’s assume you want to allow users to upload signatures as images. Also you have added one comment field where users are allowed to enter large text data. In this scenario you can convert the image as byte data and store it under the BLOB column and the comment can be saved under the CLOB column.
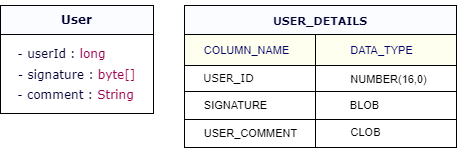
Your signature and comment field should be annotated with @Lob and that’s it. So, your entity will look like –
@Entity
@Table(name = "USER_DETAILS", schema = "demo")
public class User {

    @Id
    @Column(name = "USER_ID")
    private long userId;

    @Lob
    @Column(name = "SIGNATURE")
    private byte[] signature;

    @Lob
    @Column(name = "USER_COMMENT")
    private String comment;
}
ElementCollection
An ElementCollection is used to define a one-to-many relationship to a collection of a basic data type (e.g. String, Integer etc.) or Embeddable object.
For example, consider we have an User entity. An user can have multiple email ids. To define that, probably we will create a field inside the User entity that will hold a list of String values.
@Entity
@Table(name = "USER_DETAILS", schema = "demo")
public class User {

    @Id
    @Column(name = "USER_ID")
    private long userId;

    private List<String> emailIds;
}
Along with email collection, a user can also have multiple phones. A phone may be defined as Emmbeddable and it may contain attributes like phoneNumber, serviceProvider etc.
@Embeddable
public class Phone {

    @Column(name = "PHONE_NUMBER")
    private String phoneNumber;

    @Column(name = "SERVICE_PROVIDER")
    private String serviceProvider;
}
@Entity
@Table(name = "USER_DETAILS", schema = "demo")
public class User {

    @Id
    @Column(name = "USER_ID")
    private long userId;

    private List<String> emailIds;

    private List<Phone> phones;
}
Please note, both emailIds and phones are not a collection of entities. They are either collections of simple data types or a collection of embeddable elements (class annotated with @Embeddable).
To map this type of collection, we can use @ElementCollection annotation. Of course as these are collections of values, we have to use separate tables (child tables) and each row of those tables will contain individual elements of the collection. To specify that table we have to use @CollectionTable annotation.
Also, the child tables will contain one column to hold the parent table primary key so that parent and child tables can be linked. That column should be defined using @JoinColumn annotation.

So, our updated User class will look like below –
@Entity
@Table(name = "USER_DETAILS", schema = "demo")
public class User {

    @Id
    @Column(name = "USER_ID")
    private long userId;

    @ElementCollection
    @CollectionTable(name = "EMAIL", schema = "DEMO", joinColumns = @JoinColumn(name = "USER_ID"))
    @Column(name = "EMAIL_ID")
    private List<String> emailIds;

    @ElementCollection
    @CollectionTable(name = "PHONE", schema = "DEMO", joinColumns = @JoinColumn(name = "USER_ID"))
    private List<Phone> phones;
}
That’s the entire configuration that we have to specify. Please remember, child objects cannot be queried, persisted or merged independently. They are completely owned by the containing entity and they are modified when the entity is modified, deleted when the entity is deleted etc.
So, if you save an User object, emails and phone details will be saved automatically.
EntityTransaction transaction = entityManager.getTransaction();
transaction.begin();
User user = new User();

List<String> emailIds = Arrays.asList("[email protected]", "[email protected]");
user.setEmailIds(emailIds);

Phone phone1 = new Phone();
phone1.setPhoneNumber("123");
phone1.setServiceProvider("Airtel");

Phone phone2 = new Phone();
phone2.setPhoneNumber("456");
phone2.setServiceProvider("VI");

List<Phone> phones = Arrays.asList(phone1, phone2);
user.setPhones(phones);

entityManager.persist(user);
transaction.commit();

That’s it for now. Hope you have enjoyed this tutorial. If you have any doubt, please ask in the comment section. I will try to answer that as soon as possible. Till then, bye bye
Hi there all, here every one is sharing such knowledge, thus
it’s pleasant to read this webpage, and I used to pay a quick visit
this website all the time.