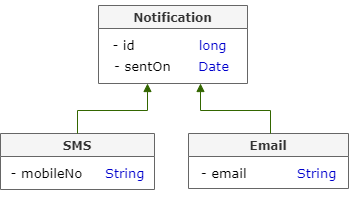
Inheritance is a fundamental concept of object oriented programming like Java. But relational databases have no concept of inheritance. To overcome this mismatch, JPA provides different strategies so that we can map inheritance class hierarchies to database tables. Those strategies are –
- Single table
- Joined tables
- Table per class
Let’s assume we have a Notification superclass and under this class we have two child classes SMS and Email to send notification to mobile number and email address.

We will map this inheritance hierarchy using all the three strategies.
Single-table strategy
In the single table strategy, all classes in the inheritance hierarchy are mapped to a single table. That means, the single table will contain columns for all the properties of all the classes in the inheritance hierarchy. If we don’t specify any strategy explicitly, JPA will choose this strategy by default.
To configure this strategy, specify the table name and the strategy on the superclass.
@Entity
@Table(name="NOTIFICATION", schema="DEMO")
@Inheritance(strategy= InheritanceType.SINGLE_TABLE)
public class Notification {
     ……
     …...
}
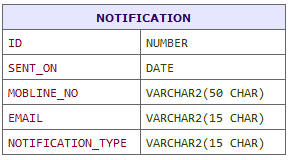
For this strategy, database table will look like below –

You may ask, why do we have an extra column called NOTIFICATION_TYPE? The reason is, both SMS data and Email data will be persisted in the same table. So how will you identify if a row is for an SMS object or Email object? To identify that we have used this discriminator column. This column will contain unique values for individual object types.
To configure this discriminator column details, we use the @DiscriminatorColumn annotation in the superclass. The name element of this annotation specifies the name of the discriminator column and the discriminatorType element specifies the data type of the discriminator column.
@Entity
@Table(name="NOTIFICATION", schema="DEMO")
@Inheritance(strategy= InheritanceType.SINGLE_TABLE)
@DiscriminatorColumn(name="NOTIFICATION_TYPE", discriminatorType=DiscriminatorType.STRING)
public class Notification {
     ……
     …...
}
Actual discriminator value should be specified by child classes using the @DiscriminatorValue annotation. When Hibernate saves a SMS object or Email object, it will set the value of the NOTIFICATION_TYPE column with specified discriminator value.
@Entity
@DiscriminatorValue(value="email")
public class Email extends Notification {
     ……
     …...
}
@Entity
@DiscriminatorValue(value="sms")
public class SMS extends Notification {
     ……
     …...
}
You may also ask, if we save a SMS object, what will be stored in the EMAIL column as that is not related to SMS class? The answer is simple, if a column is not related, that column will be populated with NULL.
If you save one SMS object having id 1 and mobileNo 123456789 and another Email object having id 2 and email [email protected], in the database the rows will look similar to below.

The main advantage of this approach is –
- It’s very simple and easy to implement.
- Easy to add new classes as you just need to add new columns in the database for the additional attributes.
- Performance wise this strategy is best since it never requires a join to retrieve data from the database as all attributes of each entity are stored in a single table. Similarly, persisting or updating an instance requires only a single
INSERTorUPDATEstatement.
To verify the last point, let’s try to fetch the SMS data from the database.
SMS sms = entityManager.find(SMS.class, 1L);
Following query will be issued by Hibernate –
select
    sms0_.ID as id2_3_0_,
    sms0_.SENT_ON as sent_on3_3_0_,
    sms0_.MOBILE_NO as mobile_n5_3_0_
from
    demo.NOTIFICATION sms0_
where
    sms0_.ID = 1
    and sms0_.NOTIFICATION_TYPE = 'sms';
There are few drawbacks of this approach as mentioned below –
- As we know, if a column is not related to one class, that column will be populated with null value. This will result in many null columns and will waste a lot of space.
- You can not use
NOT NULLconstraints on any column that isn’t common for all entities. For example, consider theMOBILE_NOcolumn. It shouldn’t be null for SMS objects. But you cannot enforce this in the database because for Email objects, that column would be populated as null.
Joined-table strategy
This strategy uses a different table for each class in the hierarchy. Each table only includes the columns specific to the corresponding class attributes. So, no discriminator is required with this strategy. For this strategy, database table will look like –

You may have noticed, each table contains the ID column (primary key), which is only defined in the Notification class. The reason is, if you try to load a subclass instance, Hibernate has to read from both that subclass table and the NOTIFICATION table. This ID column will be used to join those two tables.
The configuration is very simple. The inheritance strategy and the parent table name should be specified on the superclass.
@Entity
@Table(name="NOTIFICATION", schema="DEMO")
@Inheritance(strategy= InheritanceType.JOINED)
public class Notification {
    @Id
    @Column(name = "ID")
    private long id;

    @Column(name = "SENT_ON")
    @Temporal(TemporalType.TIMESTAMP)
    private Date sentOn;

    // getter and setter
}
In subclasses, you just have to specify the table name.
@Entity
@Table(name="EMAIL", schema="DEMO")
public class Email extends Notification {
    @Column(name = "EMAIL")
    private String email;

    // getter and setter
}
@Entity
@Table(name="SMS", schema="DEMO")
public class SMS extends Notification {
    @Column(name = "MOBILE_NO")
    private String mobileNo;

    // getter and setter
}
As you can see, there is no need to specify the join column name if the subclass and superclass have the same primary key column name. In our case the column name is ID.
If the ID column name is different for a subclass, you have to specify the column name explicitly using @PrimaryKeyJoinColumn annotation as shown below.
@Entity
@Table(name="SMS", schema="DEMO")
@PrimaryKeyJoinColumn(name = "NOTIFICATION_ID")
public class SMS extends Notification {
    @Column(name = "MOBILE_NO")
    private String mobileNo;

    // getter and setter
}
If you save one SMS object having id 1 and mobileNo 123456789 and another Email object having id 2 and email [email protected], in the database the rows will look similar to below.

The joined strategy has few advantages –
- Database tables are normalized.
- As each class has their own table, you will be able to define
NOT NULLconstraints. - If you want to add additional subclasses, you just have to add corresponding subclass tables in the database. No need to change the structure of existing tables.
But the major disadvantage is, this strategy is often the slowest of all the strategies. The reason is, retrieving any subclass requires join among multiple tables as data is distributed among multiple tables. Similarly, storing subclasses requires INSERT or UPDATE to multiple tables.
To verify the last point, let’s try to fetch the SMS data from the database.
SMS sms = entityManager.find(SMS.class, 1L);
Following query will be issued by Hibernate –
select
    sms0_.NOTIFICATION_ID as id1_3_0_,
    sms0_1_.SENT_ON as sent_on2_3_0_,
    sms0_.MOBILE_NO as mobile_n1_6_0_
from
    demo.SMS sms0_
inner join
    demo.NOTIFICATION sms0_1_
        on sms0_.NOTIFICATION_ID=sms0_1_.ID
where
    sms0_.NOTIFICATION_ID = 1;
You see, an INNER JOIN is used to fetch data from SMS and NOTIFICATION tables.
Table per class
In this strategy, a different table is created for each class in the hierarchy that will store all fields of that class plus the fields which are inherited from the superclass. For this strategy, database table will look like –

As you can see, inherited columns (ID & SENT_ON) are duplicated across tables.
Like other strategies, we have to define the strategy and identifier mapping in the superclass. But there won’t be any table mapping in the superclass.
@Entity
@Inheritance(strategy= InheritanceType.TABLE_PER_CLASS)
public class Notification {
    @Id
    @Column(name = "ID")
    private long id;

    @Column(name = "SENT_ON")
    @Temporal(TemporalType.TIMESTAMP)
    private Date sentOn;

    // getter and setter
}
Each subclass must have the table mapping.
@Entity
@Table(name="EMAIL", schema="DEMO")
public class Email extends Notification {
    @Column(name = "EMAIL")
    private String email;

    // getter and setter
}
@Entity
@Table(name="SMS", schema="DEMO")
public class SMS extends Notification {
    @Column(name = "MOBILE_NO")
    private String mobileNo;

    // getter and setter
}
If you save one SMS object having id 1 and mobileNo 123456789 and another Email object having id 2 and email [email protected], in the database the rows will look similar to below.

This strategy has few advantages –
- If you want to add additional subclasses, you just have to add corresponding subclass tables in the database. No need to change the structure of existing tables.
- When you read data by specific subclass type, this strategy selects data from only one table and no join clause is required. So, performance wise it is very efficient.
To verify the last point, let’s try to fetch the SMS data from the database.
SMS sms = entityManager.find(SMS.class, 1L);
Following query will be issued by Hibernate –
select
    sms0_.ID as id1_11_0_,
    sms0_.SENT_ON as sent_on2_11_0_,
    sms0_.MOBILE_NO as mobile_n1_5_0_
from demo.SMS sms0_
where sms0_.ID = 1;
You see, the data is selected only from a single table SMS.
There is one drawback of this approach. When the exact child class type is unknown and you query the data on superclass (may be based on id), required data can belong to any of the subclass tables. So Hibernate will SELECT from all the subclass tables and combine them using the UNION statement. After that Hibernate will apply filters on that data set. This can slow down the performance.
Please note, the UNION also includes select from superclass. But as we don’t have any table for superclass, we should make the superclass as abstract so that Hibernate can exclude superclass select.
To verify this, make the Notification class abstract and select a notification with id 1.
TypedQuery<Notification> query = entityManager.createQuery("SELECT n FROM Notification n WHERE n.id = :id", Notification.class);
query.setParameter("id", 1L);
Notification sms = query.getSingleResult();
Hibernate will generate following query to fetch the result –
select
    notificati0_.ID as id1_2_,
    notificati0_.SENT_ON as sent_on2_2_,
    notificati0_.MOBILE_NO as mobile_n1_1_,
    notificati0_.EMAIL as email1_0_,
    notificati0_.clazz_ as clazz_
from
    ( select
        ID,
        SENT_ON,
        MOBILE_NO,
        null as EMAIL,
        1 as clazz_
    from
        DEMO.SMS
    union all
    select
        ID,
        SENT_ON,
        null as MOBILE_NO,
        EMAIL,
        2 as clazz_
    from
        DEMO.EMAIL
) notificati0_
where
notificati0_.ID = 1;
You see, Hibernate first selected data from both SMS and EMAIL tables and then filtered the result based on the provided id.
MappedSuperClass
Beside these inheritance strategies, JPA also allows an entity to inherit properties from a superclass that is not an entity. To achieve this, you have to mark the superclass with @MappedSuperClass annotation. As the superclass is not an entity, it does not have an associated table.
In this approach, different tables are created for each child class in the hierarchy. Those tables will store all fields of that class plus the fields which are inherited from the superclass. So, the database table will look similar to the table per class strategy.

The superclass will look like below –
@MappedSuperclass
public class Notification {
    @Id
    @Column(name = "ID")
    private long id;

    @Column(name = "SENT_ON")
    @Temporal(TemporalType.TIMESTAMP)
    private Date sentOn;

    // getter and setter
}
Each subclass must have the table mapping.
@Entity
@Table(name="EMAIL", schema="DEMO")
public class Email extends Notification {
    @Column(name = "EMAIL")
    private String email;

    // getter and setter
}
@Entity
@Table(name="SMS", schema="DEMO")
public class SMS extends Notification {
    @Column(name = "MOBILE_NO")
    private String mobileNo;

    // getter and setter
}
If you save one SMS object having id 1 and mobileNo 123456789 and another Email object having id 2 and email [email protected], in the database the rows will look similar to below.

You can select data by specific child class type.
SMS sms = entityManager.find(SMS.class, 1L);
Following query will be issued by Hibernate –
select
    sms0_.ID as id1_11_0_,
    sms0_.SENT_ON as sent_on2_11_0_,
    sms0_.MOBILE_NO as mobile_n1_5_0_
from demo.SMS sms0_
where sms0_.ID = 1;
That’s it for now. Hope you have enjoyed this tutorial. If you have any doubt, please ask in the comment section. I will try to answer that as soon as possible. Till then, bye bye.
